Subscribe to Blog
Email Address
 
Tutorials and How-To's
Pages:(2) 1 [2]

Saving a Web Page as Plugin in HSMAdvisor

May 4, 2014, 4:38 pm by Eldar Gerfanov (Admin)

Plugins Tab now has functionality to Download and Save webpages to your computer, so they are always available offline.

There is now an address bar on the bottom of the screen.
If you enter URL address and click go, you can load website in a new tab.

You can save it as one page by right-clicking on corresponding tab and selecting "Save Page on Disk":

Alternatively you can save your webpage in ".mht" format using Internet Explorer into HSMAdvisor\plugins\ folder.

Next time you launch HSMAdvisor, your saved web page will show up in Plugins Tab.

This is where all plugins are saved:

You can use *.HTML, *.HTM, *.MHT and *.TXT files.

If you have any Microsoft Word documents you would like to keep there as well, you can save them "As Web Page" and copy to the plugins folder.

HSMAdvisor: Enabling Shared Tool Libraries

March 13, 2014, 8:58 pm by Eldar Gerfanov (Admin)

In HSMAdvisor starting from version 0.750 it is possible for sevaral HSMAdvisor seats to share the same tool and cut library (myCutDB).

All you need to do is tell all HSMAdvisor seats where the shared database file is located. And then check "Shared Database" option in settings page.
This will make all seats use this file in synchronous mode.

Which means changes to the DB made on one computer will automatically propagate to other computers as well.

This is how it looks in a more schematic way:

Whenever any change is made to the Database from one of the seats, shared Database is updated immediately.

Each seat queries the shared DB file every second to see if changes were made to it.
And if it notices changes it simply downloads the shared db and updates the myCutDB page within.

So when your coworker creates a new tool, you can see it appear on your screen right away.

These are the steps you need to perform to enable DB sharing.

  1. Export your current database. Save one copy of it for backup and save in a safe location (in case things go sour you will not loose all your tooling data)
    For that go to myCutDB page, click on [Actions] button and select [Export] -> [Export as XML file] from the drop-down menu.
  2. Save another copy of exported database in some shared folder, that all computers on your network can access.
    For example you have a network drive "U:" , copy the exported database .XML file there.
  3. In HSMAdvisor Settings page click on [Set myCutDB Location] button.
    This will open a "Open File" dialog window. Please navigate to the file you just shared and click OK
  4. Check [Shared Tool DataBase] check box Right below [Set myCutDB Location] button.
    This will allow HSMAdvisor to routinely look for changes and update the shared database file.
    If you fail to put that check mark on, the program will function in normal way and all changes will be saved to the file only when you close he HSMAdvisor program window.
    This in fact will mean that with "Shared mode" OFF, the last HSMAdvisor instance to close will overwrite changes made to by other instances that might have stored their data before that.

HSMAdvisor can now also function with multiple running instances on a single computer.
Check [Shared Tool DataBase] when you want all running instances to share the library data between them.
Same story here - if you leave that option unchecked, the last window to close will overwrite changes made by other windows that closed before it.

HSMAdvisor Pocketing Tutorial

December 12, 2013, 6:24 am by Eldar Gerfanov (Admin)

Please check out this tutorial i made for calculating speeds, feeds and engagement when pocketing.

http://www.youtube.com/watch?feature=player_detailpage&v=qctpiDWiF34

HSMAdvisor Integration with CADCAM

November 1, 2013, 9:53 pm by Eldar Gerfanov (Admin)

NOTE. THIS INTEGRATION MECHANISM HAS BEEN DEPRECIATED AND REMOVED FROM HSMADVISOR.

PLEASE CHECK OUT OUR MASTERCAM X9 AND MASTERCAM 2017 HOOKS FOR MASTERCAM

One of the most requested features in HSMAdvisor has long been integration with various CAD/CAM solutions available on the market.

There are two possible ways of achieving said task.

First way: using CAD/CAM API to create plugins to enable HSMAdvisor to "talk to" various software packages.
This road could produce the best results, however implementing it would be laborous and results not always very convinient to use.
Also developer(me) would have to create plugins for many dozens of cad/cam software packages. Muliply that by the fact that with each CADCAM release, a new version of plugin would need to be produced, tested and debugged. This work is for a whole software department and would call for a product far more expensive than what a lot of my customers could afford.

Second way: Grab tool, speed and feed data directly from the CAD/CAM window, process it and then update required information when the calculation is done.
This solution is easyer to implement and could prove to be the most convinient for user as well.

Need i tell you that i have chosen to go the easy way?

Without further delay let me introduce the first Speed and Feed calculator that can be integrated with a CAD/CAM solution by a user himself!

This is How it Works

Step One: User launches CAD/CAM solution. We will use MasterCAM x2 in our case.

A toolpath is programmed the usual way, a proper tool is selected and when it is time to enter your speed and feed data you launch HSMAdvisor.

On FSWizard page you first select the kind of work-piece material you are working with then click [Capture] button.

A new dialog window called Capture Wizard will appear.
A red message will be saying that target window was not found.

Do not worry. This simply means that you have not saved any profiles yet.

  1. Click Add button.
  2. Type in the EXACT title of the window that contains tool and cut information.
    In this particular case it will be "Drill/Counterbore". Please note that you can use particial title like "Drill/" or "bore", but "Drill/Counterbore" will still be picked up.
  3. Click OK.
    This adds the new window title into the target list.
  4. Hit [Re-Scan All] button to refresh the wizard and find our target window.

(Picture below shows exactly what we did)

A message below the target list drop-down will say whether any taget from the list was found.

Lets hope that it was. In that case Tool Data, Speed and Feed etc. groups will become available for edit.

Capture wizard scans Target Window using its title. Then it puts text from the elements if found to various drop-down lists.

Now its time to to tell our Capture Wizard which fields represent what kind of parameters.

The main fields that need to be selected are Diameter, Tool Type. RPM and Feedrate.

Those are 4 basic things that we need to get the job done.

  1. Re-Scan All to refresh the wizard and re-scan all windows if needed
  2. In tool Data Check "Capture" check box
  3. From the "Diameter" drop-down list select the value that represents the tip diamter of our tool
    In this case our drill is 0.199
  4. In the Tool Type, Material And Coating check at least Tool Type filed checkbox and select the value that contains tool type data in this window.
    In this case we choose "Tool name" field that contains word DRILL - this is enough to associate it with HSMAdvisor's Drill Tool Type
  5. Choose whether to capture tool material
  6. Choose whether to capture tool coating
    In many cases you can use text in Comment field to tell HSMAdvisor what kind of tool is being used
  7. In Speeds and Feeds section check Capture and/or Update check boxes to be able to receive and send result data.
  8. Choose values that represent Cutting speed, Chipload, RPM and feedrate
    In this case Mastercam does not even show us cutting speed or chipload! But, we can still work with only RPM and Feedrate
  9. SAVE- Click Save button to save your work on this profile.


At this point you can hit [Capture] button to transfer captured information back to HSMAdvisor.

BUT. It would not capture any tool type information.

To be able to correctly parse tool type you need to go to Tool Type, Material and Coating Recognition tab and enter "DRILL" into the Tool Type table right across Jobber Twist Drill tool type.

What capture wizard does is looks for word "DRILL" inside Tool Type Field text. If it does see that text it assumes it is Jobber Twist Drill.

Now you can his SAVE again to save your recent changes and click [Capture] button to bring all that into back to HSMAdvisor.

What then

After successfull capture you should have pretty much exactly the same data as you just had in CAD/CAM cut parameter window.

You then perform your normal calculation to find the proper speeds and feeds.

When ready you click on [Capture] button again.

If you saved your previous work you shlould now have all fields ready to use.
Make sure "Update" checkbox inside Speeds and Feeds section is ticked.

And simply click [Update] button.

This will copy the information into the corresponding fields on the target window.

Limitations and considerations

There are some limitations and considerations.

  • Target window MUST be open and it MUST be the only window with this particular title on the desktop at this particular time.
  • If target window contains different tabs, a tab with information being captured needs to be selected.
  • You may have to run HSMAdvisor in admin mode in order for this to work.
  • This only works with conventional basic windows form data and will not work for data contained in list boxes and non conventional elements like list views, tables and trees.

Conclusion

I know this may feel a little laborious, but there is no way around it if we want to implement any sort of integration across multiple CAD/CAM pacakges at once.

This Will Not work in some cases at all. In many cases some features will not work properly Always double-check your data.

Testing was done using SurfCam 5,6 and MasterCAM-X2.

Later on if this Capture Wizard catches on i will introduce pre-defined CAD/CAM profiles  for various supported software packages and their versions.

Please direct your feedback here or create a new forum thread on our support forums.

Working with HSMAdvisor myCutDB Tool Library

September 25, 2013, 9:09 pm by Eldar Gerfanov (Admin)

I have been asked to create a tutorial on how to work with the tool library, so here it is.

myCut Tool Database is quite a unique thing.

It not only contains all of your tools, but also each and every tool can have multiple operations or "Cuts" attached to it.

Everything is very simple.

Database contains Libraries

Libraries contain Tools

And Tools contain Cuts


Each entity behaves according to specific rules and "knows" specific kind of data.

Please read more to learn how it all works.

Libraries

The sole purpose of Libraries is contain Tools.

This is how you can create a new library:

  1. Go to myCut Tool DB page.
  2. Click on "Actions" button, located in top right corner.
  3. From a drop-down menu select "Create New Tool Library"
  4. Give your library a Unique and Descriptive name. Like "Drills" or "Lathe" or "Steels"
  5. An empty new tool library will be created.

This is how it looks:


After a library has been created we can start adding tools into it.

Tools

Unlike some other calculators, there is no need to add tools into your tool crib even before you start using them.

Tools and Cuts can be added on the fly right from the FSWizard page where you are doing your calculations.

Tools contain following information:

  • Tool Number: a hopefully unique number that describes usual placement of your tool in the machine.
    Don't concern your self with it too much- it is mostly used for sorting of your tool table.
  • Tool Information: Manufacturer name, Series Name, Brand Name, vendor catalogue ID, usage information, number o f tools on hand, etc.
  • Tool Geometry: Everything that relates to physical properties of the cutter.
    Like: Diameter, Helix Angle, Corner radius etc.
  • Tool Settings: Tool Torque and Deflection Limits, Speed and Feed Overrides, Productivity Override.
    Those parameters define how tool behaves.

This is how you can add tools into your library for future access:

FIRST: Make sure "Edit New Tool" is selected in Tool drop-down list: otherwise you can not edit any of tool geometry.

First perform your calculation by specifying work piece and tool material, tool geometry and overrides.

  1. Select your destination tool library where you want your new tool saved.
  2. Make sure "Edit New Tool" is selected in Tool drop-down list: otherwise you can not edit any of tool geometry.
  3. Click menu button located on the right of the Tool drop-down list.
  4. From the list of options select the only available one "Add NewTool"
  5. Edit Tool Info dialog will appear. Enter as much useful for you information as you like.
  6. Click "Add"

You need to select Edit New Tool from the list every time you want to create another tool.

This is how the whole process looks like:


After you add the tool, it will become automatically selected in tool drop-down list.
Also all tool data except for Stickout field will become inactive for editing. This is done to protect the tool entry from accidental modifications.

You could stop here.
But Tool by itself does not carry any machining data.

It does not remember workpiece material, nor will it remember most of the cutting parameters.
So next time you load this tool, you will have to choose all those things again.

This is why while we are still here we should add this specific cut to that tool we have just created.

Cuts

Cut is basically a bunch of cutting data that can be added to a tool.
Since any tool can be used in many different ways, you can add any number of cuts to each of your tools.

This way you can have many cuts that are done with the same tool in one place.

Much like what you would do in real life. As the same tool can be doing profiling, slotting and finishing.

This is the kind of data that Cuts remember:

  • Tool number if cut: this is the number that you would normally use in your program for this particular tool.
  • Cut Comment : a quick description of what you are doing.
  • Tool holder and machine information: Toolholder is for your reference only, so next time you will know what kind of tool you used.
    And machine is used to automatically select specified machine when the cut is loaded. Select -none- to leave machine alone.
  • Usage information like Operation Type, Surface Finish and Tool Life are only for your reference at this point.
  • Additional Information is used to store whatever you feel like you will need to remember when doing this job again :)

Here is how we add a Cut to the Tool:

  1. If you have not selected your tool from a drop-down list, please do so.
    Othervise Cut drop-down list will say "No tool selected" meaning that you first need to select the tool.
  2. Make sure Cut drop-down list says "Edit New Cut"
  3. Click menu button located on the right of the Cut drop-down list.
  4. From the list of options select the only available one "Add Cut"
  5. Enter as much useful info as you would like
  6. Press "Add"

This is how the whole process looks like:


New cut will be placed into the Cut drop-down list.

Thats it.

Conclusion.

Workflow as you see is simple:

  • Select destination Library
  • Define and save a Tool
  • Define and add Cuts to this Tool

Thats it folks.

Please let me know if something needs more work or clarification.

Calculating cutting parameters for custom or form tooling inside HSMAdvisor

September 10, 2013, 5:00 pm by Eldar Gerfanov (Admin)

If you are working in mold-making, prototyping or even in a job shop you have had to use unusual form tooling before in your life.

Form tooling is often used to machine undercuts and other features on regular 3 axis machines that would otherwise require a multi axis machining centre or are not machinable o at all.

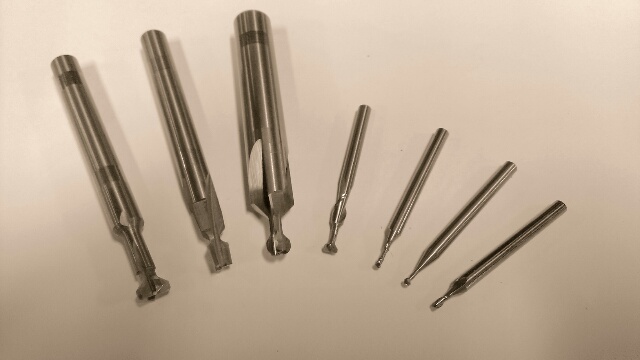
The classical example of a form tool is a tear-drop ball mil, also known as a "lollipop". It has a tip with a certain diameter and a much smaller shank that produces enough clearance to machine undercuts on straight walls. It can also be used to regular surface finishing and 2d milling.

Another example is a T-slot cutter that is used to produce key-ways and t- slots

The main thing to consider when machining with reduced shank end mils is deflection and torque.

While deflection is especially dangerous for long tools, torque becomes much more important for tools with severely reduced shank.

Torque required to break a tool is directly proportional to the diameter of its shank.

And when shank diameter is much smaller than the tip diameter it does not matter how short that weak portion is: unless you compensate for it you will snap the tool.

The first thing that crosses the mind in many such cases is "I gotta run this tool very slow". It may take forever, but in many cases job gets somewhat done.

Contrary to that many experienced machinists have been proponents of different approach. Instead of reducing feed rate to the point of rubbing and below, it is much more productive to reduce cutter engagement if possible and leave feed rate settings largely unchanged.

Trying to keep proper chip load is even more important when machining work-hardenable materials like stainless steel and titanium. In those cases rubbing is not just unproductive, it leads to a very premature, in many cases instantaneous tool failure.

Just how much of a cut is possible to take in each particular case is the black magic that separates beginners from seasoned pros.

Not to worry though

Here is an example on how to setup a form tool on HSMadvisor.

First, this is how our setup looks:

We start up the calculator and simply enter as much known information as possible.

There is a little trick.
Because the distance from the tip to the end of necked portion is shorter than the total stick out, we should assume that distance as Effective Stickout and use it for our calculations

Your calculator window should look like this:

Notice the torque warning.

What it tells you is that calculator had to limit the feedrate in order to keep the tool from snapping.
This is not an ideal situation as chipload is very small and this will lead to rubbing.
It also tells you what to do.

Simply move the Tool Performance slider to the left until we get a better chipload and/or the warning disappears:

Notice now the chipload is much better and even though calculator still limits the feedrate in order to keep within the allowed torque spec, we can live with that.

There is simply no way to make the cut we want without some sort of  feedrate compensation.

If we wanted to get the optimal chipload we would have to further reduce width or depth of cut manually.

I actually used this exact tool and speed and feed recommended by HSMAdvisor to machine a real-world aluminum mold.
I just trust my calculator so much.

This tool has been used many times by us before and every time we tried to take the full 0.070" width of cut at 6000RPM and 5 ipm. Anything harder would just snap the cutter.
Still we had bad surface finish and alot of chatter.

Simply by using smaller width of cut we were able to go faster, improve the tool life and the surface finish.

Pages:(2) 1 [2]
Sing In

© 2009-2022 Eldar Gerfanov. All Rights Reserved.
© 2009 Eldar Gerfanov. Materials on this site are presented as is and are mostly for educational use.

You may freely reproduce information presented herein without any consent from me, provided you include link to this site.
In case when i am not the copyright holder, you may want to contact proper owner of material. Anyway, they are freely available on the Internet.
If you hold the copyright right for any of the materials on this site and want them removed, please contact me here