Subscribe to Blog
Email Address
 
Pages:(35) 1 2 [3] 4 5 6 7 8 9 10 11 12 13 14 15 16 17 18 19 20 21 22 23 24 25 26 27 28 29 30 31 32 33 34 35

HSMAdvisor 2023 Black Friday Sale!

November 25, 2021, 11:04 am by Eldar Gerfanov (Admin)
(1)_image.png

BLACK FRIDAY SALE!

All licenses are 30% off!

Black Friday 2021

November 22, 2021, 12:58 pm by Eldar Gerfanov (Admin)

Good day!

I just uploaded HSMAdvisor v2.4.2

It has a lot of improvements. For a full list of changes, please check the latest release here: https://hsmadvisor.com/?page=Download

We are going to host Black Friday sale this November 26-28.

So if you were planning on purchasing something from HSMAdvisor web store, mark a date in your calendar!

https://hsmadvisor.com/?page=Buy

All non subscription HSMAdvisor and FSWizard licenses will be at significant discount!

HSMAdvisor 2.4.0

November 11, 2021, 10:59 am by Eldar Gerfanov (Admin)
(8)_image.png

The latest version of HSMAdvisor is available on the Downloads page:
https://hsmadvisor.com/?page=Download

It has a couple of big improvements, such as improved feeds for endmills smaller than 1/2" in diameter. Tool display now more accurately shows how HSMAdvisor perceives your radiused tool and material engagement.

Also fixed a problem with the Scallop Calculator. It now doesn't affect the DOC, but only sets your WOC to whatever stepover you calculated.

Huge thanks to everybody who made suggestions, reported issues, and even simply asked questions!

Cheers!

T-800

August 8, 2021, 10:25 pm by Eldar Gerfanov (Admin)

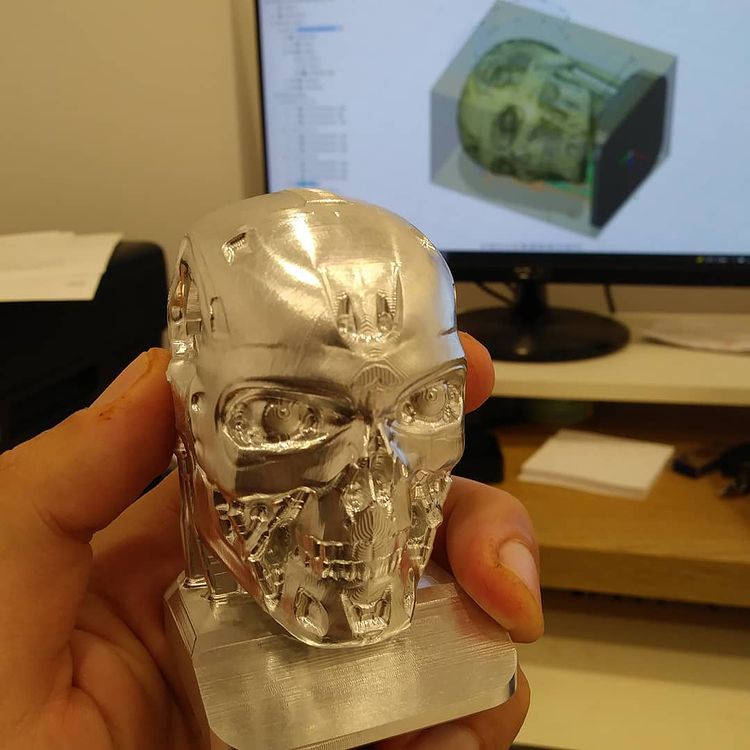
Programmed and machined a T-800 head from thingiverse:

T-800 Picture

Here is a finished scull video from all sides: https://youtube.com/shorts/mdclf5LvdyM?feature=share

In the 1st op I milled the base with a 1/4-20 tapped hole right where my Z0Y0Z0 will be.

Then I mounted the base on a square fixture using the tapped hole. This way as I index the square fixture in the vise, my part Z0Y0Z0 remain in the same spot.

2nd op was the back of the scull

3rd op was the face, and the 4th and 5th were the sides

Here is a YouTube video of some of the 3rd op machining. Warning Loud Noise!

Shariff DMC2

July 10, 2021, 6:56 pm by Eldar Gerfanov (Admin)

Thinking about getting your self an affordable desktop CNC?

Check out this Shariff DMC2 designed and built by my fellow Canadian!

I wanted to purchase the first version about a year ago, but his Kickstarter campaign has ended by then and I ended up buying a used Prolight 2000 with auto tool changer.

This looks like a quite rigid, fast and a very powerful (3HP, 24k rpm) machine.

Certainly has better accuracy and power than my old heavy desktop machine with  0.001" backlash and just 1hp, 5k spindle.

Not affiliated in any way, by the way. Just looks like a great product all around.

https://www.youtube.com/embed/e5TsK2Sp-aM

FSWizard Cut Cloud Integration.

June 30, 2021, 10:04 am by Eldar Gerfanov (Admin)

New feature coming to FSWizard - the ability to save your tools (and later cutting parameters) online for re-use later.

It is now a feature in development, but the online app already has it enabled: https://app.fswizard.com.

Take it for a spin!

This was initially planned only for the HSMAdvisor app. But since it is easier to develop for FSWizard, I decided to implement it there first. Iron out all the kinks and the flow and then roll it out for HSMAdvisor as well.

Yes, that's right. You will be able to share tools between FSWizard and HSMAdvisor!

Cheers!

FSWizard Print Report!

June 27, 2021, 10:12 pm by Eldar Gerfanov (Admin)
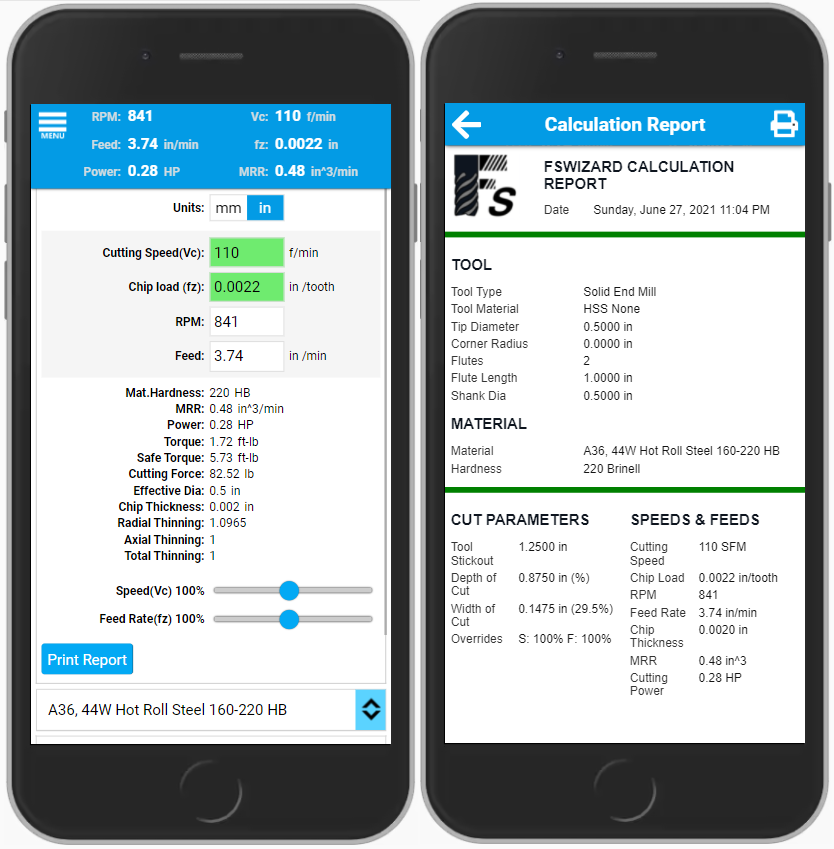
FSwizardPrintReport.png

FSWizard can now print calculation reports right from your browser or device!

Check the app out at https://fswizard.com

Just go to the Results area and tap/click on the Print Report button.
FSWizard will show the print preview dialog.

Tap/click on the Printer icon in the header, and your OS-specific print dialog will show up.

In other news, I am progressing well on adding Tool Libraries functionality to FSWizard.

This is going to be a long-awaited and huge update!

Cheers!

HSMAdvisor Machinist Calc plugin for Mastercam 2022!

June 17, 2021, 1:53 am by Eldar Gerfanov (Admin)
image.png

Inhouse Solutions has released their latest version of MasterCAM 2022 just this past Monday ...

I am sure it has lots of improvements, which I didn't yet have time to explore because I was busy porting the HSMAdvisor plugin to the latest version.

Without further adieu. Please download the HSMAdvisor hook for the latest Mastercam over here:
https://hsmadvisor.com/?page=HSMAdvisor_for_MasterCAM

As usual, please report any issues or suggestions to our support forums and/or my email!

Cheers!

HSMAdvisor Workflow Overview

April 25, 2021, 10:59 pm by Eldar Gerfanov (Admin)

As a software developer, I am always looking for quality feedback on my software and ideas.
Sometimes it is useless like "speeds and feeds are wrong" or "my cutters are breaking" without explaining what they think is wrong. 
However, the feedback is often thorough and helps propel HSMAdvisor development by miles ahead in a very short time frame.

Here is the HSMAdvisor workflow step-though by our user Jake. He posted on the support forums as an answer to another user's question. And I thought it was so good, I asked his permission to post it on the HSMAdvisor website Help section:

I've been using HMSA for about 3 years now (maybe more) and have running it down to a pretty quick science.

If I need to create a new tool I do the following:

Press reset, select tool type and fill in all parameters as accurately as possible. I click the DOC and WOC labels to set them back to default then I press the "Add Tool" button. This will bring the naming/inventory box up. I only ever fill in the the "Comment" field as this is what the tool database uses to search for tools. Once this is done I click the save button. I use multiple databases (Flat End Mills, Radius End Mills, Jobber Drills, etc) to keep thing a little more organized in my head, however this is absolutely NOT necessary...you can have 1 giant library if you want. I never delete a tool once it is defined. This makes it SUPER fast to toss a tool into a holder and get some quick feeds/speeds by just searching for the tool. It also allows me to go back and search for a tool that I have used in the past. If it is in my HSMA library, it is most likely in one of the many places tools end up hiding in my shop.

If you have the tool saved it is as simple as pressing the "Load Tool/Cut" button. Once your tool database has popped up you can simply start typing and it will find any tools with a "Comment" that matches what you have entered. It's really fast and works really well once you get used to the steps...I can type in "3/8" and get every 3/8 endmill I've ever run to come up on the screen. To make this easier on myself I always include the decimal size as well (I run quite a few regrinds) so I can type in "0.3425" and it will bring up that particular end mill instantly.

Now that your tool is defined and saved you are ready to get some cutting data. If you pick the materials list drop-down you are able to type your material in to do a quick search. I work with 6061, 7075, A2, D2, some CPM, and some plastics. All of them have come up without fail by just starting to type the material designation into the drop-down bar. Once your material is selected you can start entering cutting parameters. I pretty much always enter a DOC and then click the label for WOC to get the recommended width for the depth I am taking. I can then take this WOC value and tweak it until I max out my MRR using a combination of HSM and Chip Thinning. If I need to helix into a pocket I bring up the Circle/Ramp calculator. It is rather self-explanatory, however, you need to make sure you enter your ramp angle every time. It doesn't save a default and can give you a wonky plunge rate if you aren't careful to get the right data entered. If your pocket is going to be larger than 2xD of your tool I just enter the diameter that it will cut during the ramp. Something like 195% of the tool diameter so as to not leave a nub in the center. I also lock the spindle speed and plunge spindle speed so they are the same. I used to use different speeds for them however my machine has a gearbox that doesn't shift from low to high reliably while running a program.

Next, I verify all the green/red bars are in the "safe zones." I leave the deflection/torque sliders at the default of 70%. With long end-mills, I tend to back down the deflection limit and lower the speed slider significantly.

Finally, I can take the calculated values from the top right box and enter them into Mastercam. I tried to set up the integration between HSM and MCAM years ago but it kinda shoehorned the functionality of HSMA from my standpoint. I use 2 monitors and leave HSM on one and MCAM on the other so I can bounce back and forth. If you only have 1 monitor there is a button for a "Floating Feed/Speed" window that will stay on top of MCAM and allow you to get the data moved without tons of switching programs on a single screen.

So that's the basic workflow I use for HSMA and MasterCam. It is not a perfect system but it is really quick. I can grab a tool I have defined in the past, select material, type in DOC, and have workable numbers to start from. It takes about 10 seconds....this program works exactly like my brain does.... it's almost weird how natural it feels.

Sorry if this is an overwhelming post on a necro thread, it is so much harder to explain how to use the software than it is to just....use the software. lol.

Jake

Custom CNC Pendant Project

April 13, 2021, 12:28 am by Eldar Gerfanov (Admin)
Pendant.jpg

Ever since getting my benchtop CNC running, I have not been very happy with the lack of manual control over overrides and buttons.

This DIY Engineering video gave me a great idea: build one myself.

I wanted the smooth speed and feed overrides, so I decided to not go with HID device, but instead with a full serial control paired with a custom plugin on the UCCNC side.

Here is the Fusion design of the enclosure:

And here it is 3D-Printed.
Acrylic face engraved from the back side and painted.
And all buttons and controls mounted:

All I have to do now is wire the Arduino board, program the plugin, and test it!

Update:

Here is the video of the pendant in action:


1. PCB Design

Design notes:

  • All resistors used were 10K
  • Speed and Feed potentiometers are 10K
    Their pinout goes Wiper->ground = 0%, Wiper -> +5V = 200%
  • Axis and Handwheel Increment rotary switches are 4-position and their pinout goes like this:
    Axis select 1-X, 2-Y, 3-Z, 4-A, C-Common (+5V)
    Handwheel Increment 1-0.0001, 2-0.0010, 3-0.0100, 4-0.1000, C-Common (+5V)
  • All function buttons such as Jog +/-, M1, M2, etc are sending +5V signals to the digital pins D2-D12
  • D13 digital pin is connected to a LED indicator and is used to tell the user that the Pendant is allowed to send signals to the plugin.

Design files:

2. Enclosure Design

https://a360.co/3fG3jgI 

image

If you don't have a 3D printer and/or a CNC Mill, please contact me and I will send you a 3d-printed enclosure and the 3d-printed or milled acrylic face plate:

  • 3D-Printed Black PLA Enclosure (shown in pictures): 30$ + shipping
  • 3D-Printed Black PLA Face Plate (optional): 15$ + shipping
  • CNC Milled and Engraved unpainted (clear) acrylic Face Plate (shown in pictures): 30$ + shipping

3. Arduino Setup

  • Install the Full Firmata library onto your Arduino Nano (Or any other Ardiono that supports USB Serial Communication): imageStandardFirmata sketch used for Arduino NANO is also added to the release package
  • Please note that you might need to install Arduino USB Driver in order for your Arduino to work on the target computer!

4. UCCNC Setup

  • Download the latest LEETArduinoPendant from the releases and extract it to your PC.
    https://github.com/swindex/LEETArduinoPendant/releases
  • Copy the LEETArduinoPendant.dll plugin file to the C:\UCCNC\Plugins directory!
  • Copy the Solid.Arduino.dll file from the Solid.Arduino release folder to the C:\UCCNC directory.
  • Please note that you might need to install Arduino USB Driver in order for your Arduino to work on the target computer!
  • Launch UCCNC.exe, go to Settings->Configure Plugins, and mark the LEET Arduino Pendant plugin as Enabled and Call startup
  • After everything is installed, Arduino is connected and UCCNC is running, press the "Enable" (+5v to D2-B-ENABLE ) button that will tell the plugin that the pendant is ready to send signals! D13 (LED+) will then have a continuous +3.3V signal alerting you of that!

Hardware Acquisition (Amazon)

Fusion F360 desing files Leet-Pendant-3D-Bodies.zip Size:2.55 MB
Pages:(35) 1 2 [3] 4 5 6 7 8 9 10 11 12 13 14 15 16 17 18 19 20 21 22 23 24 25 26 27 28 29 30 31 32 33 34 35
Sing In

© 2009-2022 Eldar Gerfanov. All Rights Reserved.
© 2009 Eldar Gerfanov. Materials on this site are presented as is and are mostly for educational use.

You may freely reproduce information presented herein without any consent from me, provided you include link to this site.
In case when i am not the copyright holder, you may want to contact proper owner of material. Anyway, they are freely available on the Internet.
If you hold the copyright right for any of the materials on this site and want them removed, please contact me here