Custom CNC Pendant Project
April 13, 2021, 12:28 amArticle Summary
Eldar Gerfanov (Admin)
April 13, 2021, 12:28 am
Eldar Gerfanov (Admin)
November 2, 2023, 4:28 pm
15208
503
Public
Author Summary
Wed February 11, 2026, 6:21 am
Wed February 11, 2026, 6:21 am
Ever since getting my benchtop CNC running, I have not been very happy with the lack of manual control over overrides and buttons.
This DIY Engineering video gave me a great idea: build one myself.
I wanted the smooth speed and feed overrides, so I decided to not go with HID device, but instead with a full serial control paired with a custom plugin on the UCCNC side.
Here is the Fusion design of the enclosure:
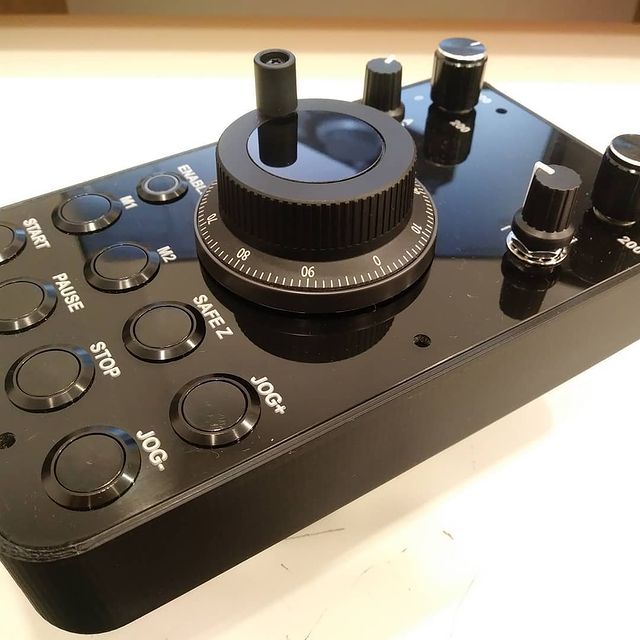
And here it is 3D-Printed.
Acrylic face engraved from the back side and painted.
And all buttons and controls mounted:

All I have to do now is wire the Arduino board, program the plugin, and test it!
Update:
Here is the video of the pendant in action:
1. PCB Design
Design notes:
- All resistors used were 10K
- Speed and Feed potentiometers are 10K
Their pinout goes Wiper->ground = 0%, Wiper -> +5V = 200% - Axis and Handwheel Increment rotary switches are 4-position and their pinout goes like this:
Axis select 1-X, 2-Y, 3-Z, 4-A, C-Common (+5V)
Handwheel Increment 1-0.0001, 2-0.0010, 3-0.0100, 4-0.1000, C-Common (+5V) - All function buttons such as Jog +/-, M1, M2, etc are sending +5V signals to the digital pins D2-D12
- D13 digital pin is connected to a LED indicator and is used to tell the user that the Pendant is allowed to send signals to the plugin.
Design files:
- Electronics Design: https://a360.co/3NGWRTP
- https://a360.co/3NLhfDk
- https://a360.co/3JObaVh
2. Enclosure Design
If you don't have a 3D printer and/or a CNC Mill, please contact me and I will send you a 3d-printed enclosure and the 3d-printed or milled acrylic face plate:
- 3D-Printed Black PLA Enclosure (shown in pictures): 30$ + shipping
- 3D-Printed Black PLA Face Plate (optional): 15$ + shipping
- CNC Milled and Engraved unpainted (clear) acrylic Face Plate (shown in pictures): 30$ + shipping
3. Arduino Setup
- Install the Full Firmata library onto your Arduino Nano (Or any other Ardiono that supports USB Serial Communication):

StandardFirmatasketch used for Arduino NANO is also added to the release package
- Please note that you might need to install
Arduino USB Driverin order for your Arduino to work on the target computer!
4. UCCNC Setup
- Download the latest LEETArduinoPendant from the releases and extract it to your PC.
https://github.com/swindex/LEETArduinoPendant/releases - Copy the
LEETArduinoPendant.dllplugin file to the C:\UCCNC\Plugins directory! - Copy the
Solid.Arduino.dllfile from theSolid.Arduinorelease folder to the C:\UCCNC directory. - Please note that you might need to install
Arduino USB Driverin order for your Arduino to work on the target computer! - Launch UCCNC.exe, go to
Settings->Configure Plugins, and mark theLEET Arduino Pendantplugin asEnabledandCall startup - After everything is installed, Arduino is connected and UCCNC is running, press the "Enable" (+5v to D2-B-ENABLE ) button that will tell the plugin that the pendant is ready to send signals! D13 (LED+) will then have a continuous +3.3V signal alerting you of that!
Hardware Acquisition (Amazon)
1280 Pieces 64 Values Resistor Kit, 1% Assorted Resistors 1 Ohm-10M Ohm 1/4W Metal Film Resistors Assortment with Storage Box for DIY Projects and Experiments
Smraza 100 Pcs PCB Board Kit with 30 Pcs Double Sided Prototype Boards set and 30 Pcs 40 Pin 2.54mm Male and Female Header Connector for DIY Soldering and Electronic Project and Extra 10pcs Screw Terminal Blocks and 30pcs Jumper Caps- 2 x
Uxcell a13122500ux0394 3P4T 3 Pole 4 Position Single Wafer Band Selector Rotary Switch w Knob
12mm LED Power Push Button Switch, Keenso Waterproof Metal Momentary Type Self-resetting Nickel-Plated Latching Push Button Switch On/Off Latch Button Switch 2/3V(Blue - 3V)
2 Pcs B10K 10K Ohm 13mm Rotating Shaft Single Linear Potentiometer Pot
100PPR 6 Terminal Electronic Hand Wheel Manual Pulse Encoder for CNC System (Black)
KeeYees Nano V3.0 Module Soldered, Mini Nano Board ATmega328P CH340G Chip, 5V 16MHz for Arduino, with Nano Terminal Adapter Shield Expansion Board, 1.5m USB Cable
FICBOX 8pcs 16mm 5/8" Push Button Switch Metal Momentary Waterproof Start Button Switches for Car RV Truck Boat


Gary D
Can you post the *.STL files for the box and lid. The fusion drawing will not allow separation of the box and lid. Kinda hard to print that way.
Eldar Gerfanov (Admin)
Tony
Hi, I'm having trouble getting it to work. I did everything written there, but unfortunately nothing works. could you help me solve it?Tony
Solved. It works!!
Eldar Gerfanov (Admin)
Hi, Great!
Please let me know if there was an error in any of the documentation, so I can update it!