Working with HSMAdvisor myCutDB Tool Library
September 25, 2013, 9:09 pmArticle Summary
Eldar Gerfanov (Admin)
September 25, 2013, 9:09 pm
September 25, 2013, 10:06 pm
8831
Public
Author Summary
Thu April 18, 2024, 1:36 am
Thu April 18, 2024, 1:36 am
I have been asked to create a tutorial on how to work with the tool library, so here it is.
myCut Tool Database is quite a unique thing.
It not only contains all of your tools, but also each and every tool can have multiple operations or "Cuts" attached to it.
Everything is very simple.
Database contains Libraries
Libraries contain Tools
And Tools contain Cuts
Each entity behaves according to specific rules and "knows" specific kind of data.
Please read more to learn how it all works.
Libraries
The sole purpose of Libraries is contain Tools.
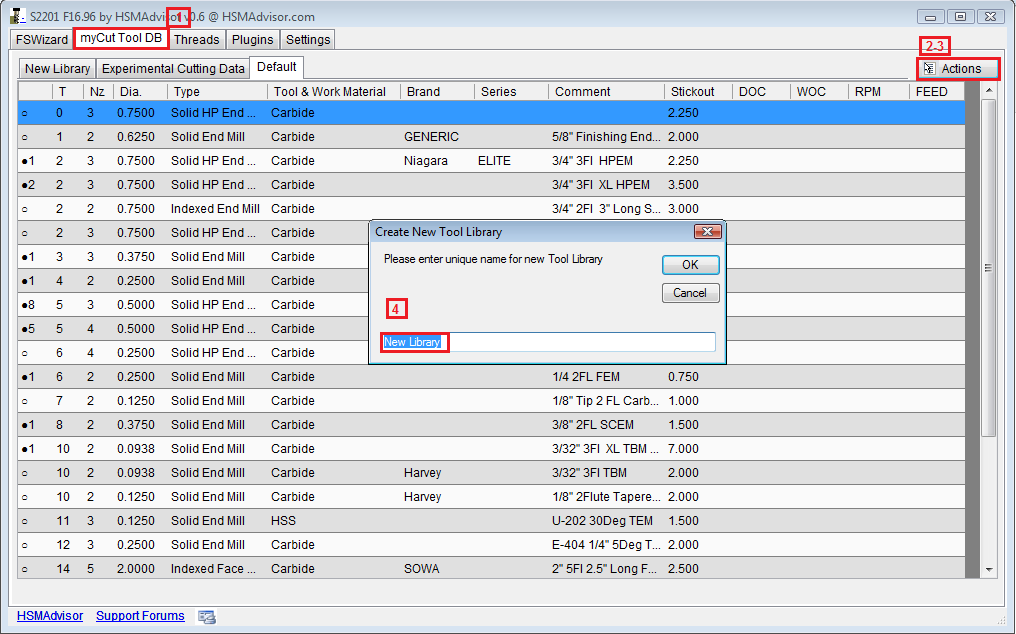
This is how you can create a new library:
- Go to myCut Tool DB page.
- Click on "Actions" button, located in top right corner.
- From a drop-down menu select "Create New Tool Library"
- Give your library a Unique and Descriptive name. Like "Drills" or "Lathe" or "Steels"
- An empty new tool library will be created.
This is how it looks:

After a library has been created we can start adding tools into it.
Tools
Unlike some other calculators, there is no need to add tools into your tool crib even before you start using them.
Tools and Cuts can be added on the fly right from the FSWizard page where you are doing your calculations.
Tools contain following information:
- Tool Number: a hopefully unique number that describes usual placement of your tool in the machine.
Don't concern your self with it too much- it is mostly used for sorting of your tool table. - Tool Information: Manufacturer name, Series Name, Brand Name, vendor catalogue ID, usage information, number o f tools on hand, etc.
- Tool Geometry: Everything that relates to physical properties of the cutter.
Like: Diameter, Helix Angle, Corner radius etc. - Tool Settings: Tool Torque and Deflection Limits, Speed and Feed Overrides, Productivity Override.
Those parameters define how tool behaves.
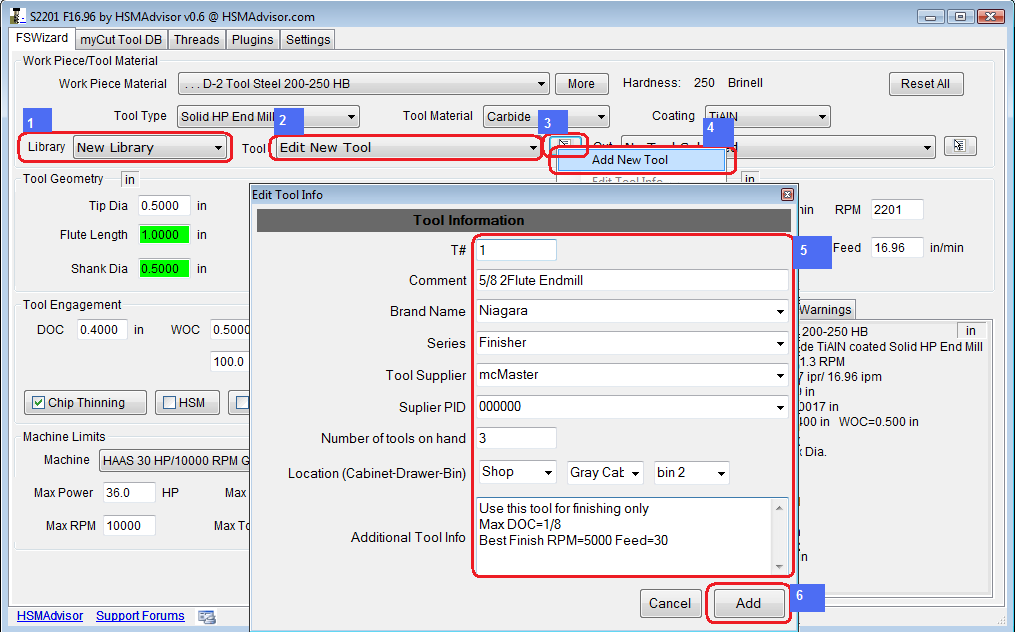
This is how you can add tools into your library for future access:
FIRST: Make sure "Edit New Tool" is selected in Tool drop-down list: otherwise you can not edit any of tool geometry.
First perform your calculation by specifying work piece and tool material, tool geometry and overrides.
- Select your destination tool library where you want your new tool saved.
- Make sure "Edit New Tool" is selected in Tool drop-down list: otherwise you can not edit any of tool geometry.
- Click menu button
 located on the right of the Tool drop-down list.
 - From the list of options select the only available one "Add NewTool"
- Edit Tool Info dialog will appear. Enter as much useful for you information as you like.
- Click "Add"
You need to select Edit New Tool from the list every time you want to create another tool.
This is how the whole process looks like:

After you add the tool, it will become automatically selected in tool drop-down list.
Also all tool data except for Stickout field will become inactive for editing. This is done to protect the tool entry from accidental modifications.
You could stop here.
But Tool by itself does not carry any machining data.
It does not remember workpiece material, nor will it remember most of the cutting parameters.
So next time you load this tool, you will have to choose all those things again.
This is why while we are still here we should add this specific cut to that tool we have just created.
Cuts
Cut is basically a bunch of cutting data that can be added to a tool.
Since any tool can be used in many different ways, you can add any number of cuts to each of your tools.
This way you can have many cuts that are done with the same tool in one place.
Much like what you would do in real life. As the same tool can be doing profiling, slotting and finishing.
This is the kind of data that Cuts remember:
- Tool number if cut: this is the number that you would normally use in your program for this particular tool.
- Cut Comment : a quick description of what you are doing.
- Tool holder and machine information: Toolholder is for your reference only, so next time you will know what kind of tool you used.
And machine is used to automatically select specified machine when the cut is loaded. Select -none- to leave machine alone. - Usage information like Operation Type, Surface Finish and Tool Life are only for your reference at this point.
- Additional Information is used to store whatever you feel like you will need to remember when doing this job again :)
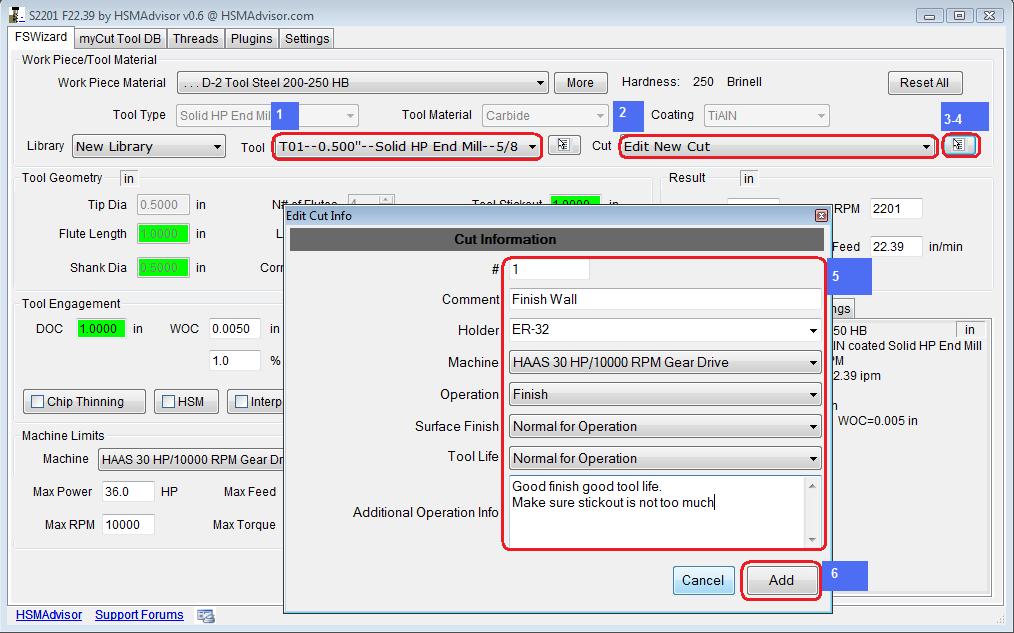
Here is how we add a Cut to the Tool:
- If you have not selected your tool from a drop-down list, please do so.
Othervise Cut drop-down list will say "No tool selected" meaning that you first need to select the tool. - Make sure Cut drop-down list says "Edit New Cut"
- Click menu button
 located on the right of the Cut drop-down list.
 - From the list of options select the only available one "Add Cut"
- Enter as much useful info as you would like
- Press "Add"
This is how the whole process looks like:

New cut will be placed into the Cut drop-down list.
Thats it.
Conclusion.
Workflow as you see is simple:
- Select destination Library
- Define and save a Tool
- Define and add Cuts to this Tool
Thats it folks.
Please let me know if something needs more work or clarification.